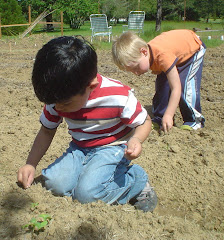
It's difficult to show the evolution of the garden because of its size (80'X 100'). Pictures taken to capture the whole garden just blur into a lot of undistinguished greenery and its easy to lose scale. Here's a short photo essay that shows the progress of one aspect of the garden; the pole-bean tipi that we made and planted in late May.
We began by prepping the soil, fluffing it up with a spade-fork and digging in rabbit manure. Beans don't need a lot of fertilization as they are able to "fix" nitrogen from the air. We mounded the soil into a ring and lay down a heavy bed of straw in the middle (6" thick). Next we chose three stout, straight bamboo poles and tied a knot around them about six feet from the ground. You want to place your knot lower than the height of your shortest other poles as they need to be able to lay in the crotches formed by this tripod. Spread the three tied poles into a tripod with the legs equal distance apart. Lay the other poles in the spaces between these main poles so that you eventually end up with your poles 4-5 inches apart at the bottom. Work your way in a spiral laying a new pole between these original 3 poles in a circular direction. Be sure to leave space for a door. Later in the summer, the tipi provides excellent shade and it's easiest to harvest the beans from within.
Here's the tipi's top after all the poles have been placed:

Plant the beans about 4-5 inches apart. Beans are a large seed so you don't have to groom the soil as much as for small seeds such as carrots or basil.

Here's the tipi about three weeks after we built it and planted the beans:

This picture was taken about eight weeks after planting:

Here's Llyn in the door of the tipi almost 10 weeks after planting, in late July (those are buckets of manure tea in the lower right-hand corner):

We harvested beans off the tipi for several weeks and yielded many, many pounds which we took to the food bank. It was relatively easy to harvest the beans because they hung down into the center of the tipi. Next year we're going to grow our cucumbers on a slanted trellis so they will hang down and be easy to harvest as well. This next picture was taken in late September just a week or so before we had a killing frost. Here's Llyn harvesting the dried bean-pods to thresh and save the seed for next year's garden.

This last picture was taken in mid-October, a few weeks after the killing frost. That's a giant artichoke plant in the foreground (started from seed last March! - It had it's roots in a pile of seasoned rabbit manure.) One quarter of the garden is behind the pole-bean tipi and to the left.
Our garden has mostly been put to bed for the winter. We have some winter greens planted, some carrots and beets. We'll continue top harvest and share these as they ripen. The days are getting noticeably shorter and the winter rains have begun to fall in Oregon.
Thanks for following along on our garden adventure.
Llyn and Chris
We began by prepping the soil, fluffing it up with a spade-fork and digging in rabbit manure. Beans don't need a lot of fertilization as they are able to "fix" nitrogen from the air. We mounded the soil into a ring and lay down a heavy bed of straw in the middle (6" thick). Next we chose three stout, straight bamboo poles and tied a knot around them about six feet from the ground. You want to place your knot lower than the height of your shortest other poles as they need to be able to lay in the crotches formed by this tripod. Spread the three tied poles into a tripod with the legs equal distance apart. Lay the other poles in the spaces between these main poles so that you eventually end up with your poles 4-5 inches apart at the bottom. Work your way in a spiral laying a new pole between these original 3 poles in a circular direction. Be sure to leave space for a door. Later in the summer, the tipi provides excellent shade and it's easiest to harvest the beans from within.
Here's the tipi's top after all the poles have been placed:

Plant the beans about 4-5 inches apart. Beans are a large seed so you don't have to groom the soil as much as for small seeds such as carrots or basil.

Here's the tipi about three weeks after we built it and planted the beans:

This picture was taken about eight weeks after planting:

Here's Llyn in the door of the tipi almost 10 weeks after planting, in late July (those are buckets of manure tea in the lower right-hand corner):

We harvested beans off the tipi for several weeks and yielded many, many pounds which we took to the food bank. It was relatively easy to harvest the beans because they hung down into the center of the tipi. Next year we're going to grow our cucumbers on a slanted trellis so they will hang down and be easy to harvest as well. This next picture was taken in late September just a week or so before we had a killing frost. Here's Llyn harvesting the dried bean-pods to thresh and save the seed for next year's garden.
Bean pods should be brown and mostly dry to the touch before you harvest them for seed. They won't develop much at all after you pick them and so you want the ripest, fullest bean-pods to ensure the most viable seeds. Here are a few ripe ones. This variety is called "Blue Lake" pole beans. (Blue Lakes also come in a bush-variety that won't vine up the poles.)

This last picture was taken in mid-October, a few weeks after the killing frost. That's a giant artichoke plant in the foreground (started from seed last March! - It had it's roots in a pile of seasoned rabbit manure.) One quarter of the garden is behind the pole-bean tipi and to the left.
Our garden has mostly been put to bed for the winter. We have some winter greens planted, some carrots and beets. We'll continue top harvest and share these as they ripen. The days are getting noticeably shorter and the winter rains have begun to fall in Oregon.
Thanks for following along on our garden adventure.
Llyn and Chris


No comments:
Post a Comment