In order to save seeds that will "grow true" and produce fruit similar to the one you saved seeds from, you must start with an "heirloom" or "open-pollinated" (OP) variety. Hybrid seeds are artificially created by seed companies to produce plants with unique qualities (early ripening, bug resistance etc). The problem is that they don't "breed true". If you save seed from hybrids, next year's plants may or may not be what you want. If you wish to save seeds, choose seeds or starts that say "open pollinated", OP, heirloom or non-hybrid.
OK, so lets say you have grown some beautiful heirloom tomatoes and you're ready to save seeds. If you have more than one plant to pick from, choose the plant that is healthiest, most robust, earliest to ripen and with the best-tasting fruit. Then, pick one or two fruits that are the best examples of these same qualities.. If there are other people who harvest from your garden, put a twist-tie, or in some other way mark the fruit so no one picks it prematurely. Let the fruit come to fullest maturity possible. It's OK even if it starts to rot a little.
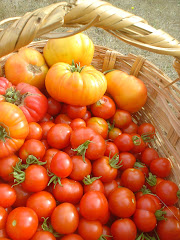
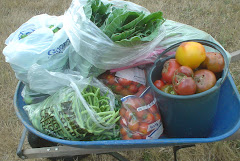
 Here are two heirloom tomato varieties we saved for seed this year. We saved them as beautiful examples of color, juiciness and size. That's a Black Krim in the lower-left and a Striped German in the upper-right.
In saving seed, you wish to mimic nature's process. Have you ever noticed what happens to the tomatoes left in the garden after the first frost? They turn to a slimy mush, with the fruit eventually dissolving away from the seed. In the following year, robust little volunteers emerge from where the tomato rotted. The way we mimic this process: Cut open the chosen tomato and put it in the blender with about the same amount of water as tomato pulp. Whiz it in the blender for about a minute, so all the flesh separates from the seeds. Don't about the seeds. They have a protective gel that keeps the blades from harming them. Pour them into a wide-mouth glass jar. Be sure to swirl the blender as you pour the last liquid out so no seeds are left in the bottom. If you're processing more than one tomato variety in a row, rinse the blender well so you don't mix seed varieties. Label the jar so you remember the variety of seeds you're saving.
The next step is to leave them to "rot". Leave them in the open jar for 4-7 days. When it's warm outside, the process will go faster. Stir them once or twice a day with a chopstick to help separate the seed from the pulp. (If fruit flies are a problem, cover the jar with cheesecloth during the fermentation process.) The pulp and non-viable seeds will form a layer at the top. The healthy seeds will sink to the bottom. Look for a nice scum to form on the top. Mold is OK. The picture on the left is of two varieties of tomato seeds in process. The ones on the right were just blended so no layers have formed. The ones on the left have been sitting a few days. The other picture shows the quality of the scum that has formed on the tomatoes once they are ready for the next step. Notice the bubbles which indicate a mild fermentation process.


The last step is to dry the seeds. Spoon out the scum and pour off most of the water. Add more water and stir them to loosen any remaining flesh and carefully pour off the excess water. Repeat this process till you've removed the majority of the flesh. Then pour the seeds through a fine-mesh strainer and rinse them in the strainer. Let them drip-dry and then tap them onto a piece of tin-foil, a jar-lid or other non-porous surface. Seeds will stick to paper towel or napkins. Transfer your label to the drying seeds and leave them to dry for a week or so. Be sure they are thoroughly dry before storage so they don't mold in the bag, envelope or jar.
Each seed-saver has his or her preference for containers to store seeds in. We use clean, small plastic bags or recycled plastic pill-bottles or other small jars. The most important thing is to keep your whole seed collection in a dry, dark environment with moderate temperatures. Avoid freezing or excessive heat. Stored well, seeds can remain viable for many years.