Our new and improved site

(with the same content as this one, AND MORE!) is

www.The SharingGardens.blogspot.com/

Sunday, October 22, 2017

Grow Your Own 'Blue Corn'


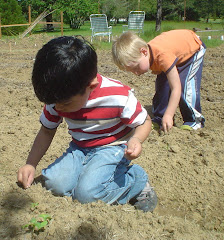
Jim husks blue corn.
Part of becoming more self-sufficient has been to grow our own corn-meal. We chose an heirloom-variety of blue corn called Hooker's Blue because it's easy to grow, has high yields and makes delicious corn-meal that can be used as hot cereal, and in baked goods such as corn bread and pancake mix.

Our first corn crop was in the summer of 2015. We'd been given a small, shriveled ear at a seed-swap. The corn was already two years old and, since corn seed degrades faster than most, we weren't sure how viable it would be. In this case we pre-sprouted it and only planted seeds that germinated. Our young friend Serenity patiently and diligently planted the corn in cultivated soil -- 5" apart and 1" down, gently covering the seeds with soil as she went.

This is the cob-size we used to start our first crop of Hooker's Blue corn. Just two years later, our harvest is enough to feed us for a year with surplus to share with the garden-families who help us (at least 10-gallons of shucked corn! This was from four, sixty-foot rows.)

We have a lot of blue-jays in our neighborhood, and some crows - both who love corn! One year we planted corn, saw the new seedlings sprout above-ground in the afternoon -- a whole long, row of them, came back the next morning and discovered that each and every one had been dug up and eaten! So, to prevent this happening again we covered our newly planted corn with 'floating row cover' (brand-name: "Reemay") a synthetic, white cloth that lets rain and sunlight reach the plants but protects them from light frosts and hungry garden-creatures! Reemay must be pinned in place, or held down with bricks or stones. It can be left on till seedlings start pushing at it from below at which point it's unlikely that birds/animals will dig up and eat your plants.

Covered row cloth protects young crops from mild frosts and animals that might eat the tender, new plants. Remove once plants are pushing up on bottom of cloth. (Pic credit)

The soil we planted in was fairly poor and newly tilled so once the seedlings were a few inches above-ground, we gave them a thorough soaking with compost-tea.

Compost tea is steeped in large batches and then poured generously on crops to fertilize them.
That first year, our harvest was moderate but plenty for a large seed-crop to plant in our second year. Since we had plenty of fresh seed, we used a different method for planting. We prepared the ground by spreading a light sprinkling of wood-ash LINK. Chris tilled this into the soil as deep as the tiller would go. He then scattered a combination of corn seed and kidney bean seeds (a 'bush' variety that we dried and shelled for use in soups and chili). He then set the tiller to a very shallow setting - about 2", and tilled both varieties of seed into the ground. We then marked the row with string so no-one would walk on it and waited for the seedlings to emerge.

The orange string (around bed to left of hose) is used to mark newly planted soil so no one walks on it by accident.
Corn is typically a heavy-feeder (it needs rich, fertile soil). If your soil is depleted, your corn-crop will benefit from additional feeding as it grows. This past year, about mid-season, after a thorough weeding, we added a thick layer of partially composted leaves and grass-clippings around the base of the corn and bean plants. Then, whenever we watered, the plants were fed.

Shucking corn and shelling beans are a favorite autumn activity at the Sharing Gardens.
Corn is pollinated primarily by wind so it is best if you plant either multiple rows, near to each other, or wide-beds (the width of the tiller - as we did). If you are growing a small crop, planting it in a solid square, or block works well too. Since the beans and corn are both left till dry on the plant, you do not need access to the plants in the center of the patch during the growing season. (Note: Hooker's Blue corn is also quite tasty as a sweet-corn if you harvest it once kernels are fully formed but still soft and yellow. Cook as you would regular sweet-corn).

Hooker's Blue corn, though not very tall at full height (typically 4 to 4 and 1/2 feet) yields large harvests -- one to two 4"-6" ears per stalk. Here, students are mulching an adjacent bed with wheat straw.

In this picture, corn has finished ripening, and partially drying on the stalk. Christie harvests the ears to be husked and further dried in our greenhouse.
Because we use the corn to make corn-meal, we leave it on the plants, in the field, till it is quite hard and has turned dark purple (almost black). We check it every few days by pressing a fingernail into the kernels of corn. It's done when you can no longer dent it with your nail. Ears of corn are then harvested, husked and left to dry on racks in our greenhouses. The dryer it is, the easier it is to remove the kernels from the cob (shucking). If Fall weather starts getting too damp for the corn to dry properly, we bring it inside and put it on shelves above our wood stove to finish the process.

Christie and Chelsea remove husks and lay cobs onto a drying table to continue to dry. Corn is easiest to remove from the cobs if it is dried well.


Shucking can be done simply by twisting the cobs in your hands to break loose the kernels (you might want to wear gloves!). If you have a lot of shucking to do, here's a simple tool Chris made that really speeds up the process!

Home-made corn-shucker. The cob is twisted against protruding screws.
Close-up of corn-shucker. Long screws are driven in from four sides leaving an interior hole ~ one-inch in diameter so cob fits but corn is rubbed off; wood is added at ends to prevent splitting and the handle makes it easier to use.
A tub of dried corn-kernels.
Lastly, be sure to store your corn in a cool place, in air-tight containers. Because of corn's high oil content it can go rancid; this ruins the flavor and makes it unhealthy to eat. Be sure to set aside enough seed for next year's crop. To ensure best viability, we freeze our corn-seed in air-tight containers.

Grinding corn: Obviously, if you're growing your own corn for grinding, you're going to need a grain-mill! After carefully comparing reviews of different brands and models, we chose to invest in a top-of-the line Diamant grain-mill. This is considered an 'heirloom' appliance in that, with proper care it will last for generations. Ours came with a handle for hand-grinding, can be hooked up to a bicycle for larger, human-powered batches or hooked up to a small motor (which is what we did) so we can grind large batches with ease. If the price-tag is prohibitive, consider purchasing one with your neighbors and setting it up in a central location for all to share.

Mill hooked up to motor for faster grinding. It comes with a handle, for hand-grinding and we also have seen instructions for hooking it up to a stationary bicycle.

Close-up view of Diamant grain-mill. The 'can' on top has an open bottom and allows us to pour more grain in at a time. The knob at left adjusts the fineness of the grind.
Close-up of mounted engine.
Variety we like: Hooker's Blue corn
Obtained from Native Americans in the Pacific NW (Washington state, USA) in the 1950's. It is an Heirloom, non-hybrid variety that will "grow-true" year-after-year so you can save your own seed.
Description: 75-80 days - to maturity. The 4-4 1/2 foot stalks produce 5-7 inch ears of some of the finest tasting corn. Ears typically have 10-12 rows of kernels that dry blue-black upon maturing - 1 or 2 ears per plant LINK - Reviews of Growers.
Why we like it: Does well in a cooler, damper climate. Because of its short-stalk, it won't 'lodge' (fall over) as taller varieties sometimes do. Grinds into the sweetest cornmeal! Can be as much as 30% higher in protein than regular 'sweet-corn' LINK-nutritional facts.

Favorite recipes: Hooker's Blue corn is deliciously sweet and nutty-flavored. Here are some ideas for using it in recipes.

Hot cereal: Stir ground corn into lightly salted water in a 2:1 ratio (twice as much water as corn). Gently heat the corn  and water together, stirring occasionally and simmer on low heat, in a covered pan for ~20 min.

Crumb-Free Whole Grain Corn Bread: We make a large batch of the dry-mix ahead of time so it's easy to just add milk, eggs and oil for a quick batch of corn bread or pancakes. Yum! LINK-Recipe

Whole Grain No-Knead Bread: We've adapted Jim Lahey's delicious no-knead bread-recipe to incorporate whole wheat flour and blue-corn meal. So tasty and nourishing! LINK-Recipe


Scarlet Runner Beans: Here is a post about "Growing Your Own Protein - Scarlet Runner Beans" - LINK. Beans and corn together give you all the essential amino-acids needed in one meal (a complete protein) and it's delicious too!

Beautiful scarlet runner bean blossoms!
Leave us your tips for growing, and links to recipes in the comments below! 

Saturday, October 21, 2017

Whole Grain No-Knead Bread - Recipe

Several years ago, a New York City baker named Jim Lahey developed and published a recipe for "No-Knead Bread". It is a very popular recipe and one that Chris and I used for several months while refining our skills at producing consistent results.

Original recipe of No-Knead Bread using pure, white bread flour and no whole grains.
Once we mastered the original recipe we experimented in adding whole grains, nuts and dried fruit. Here is our recipe in which we use blue corn meal we grew ourselves LINK-How to Grow Blue Corn Meal.

2 cups bread flour *
1/2 cup whole wheat flour
1/2 cup blue corn meal-finely ground**
1 and 1/4 teaspoon salt
1/4 teaspoon dry yeast ***

1 7/8 cups mildly warm water

Mix all dry ingredients together thoroughly with your hands. It is important that the yeast and salt be evenly distributed both for flavor and effectiveness of the 'rise'. If you prefer, you can use a fork, but with your hands you can feel if all lumps of flour have been broken-apart and it just feels good to get your hands in the flour!

Mixing by hand insures that all ingredients are thoroughly mixed, with no clumping of any single ingredient.
Water should be about room-temperature. Too cold and it takes awhile for the yeast to awaken; too warm and it encourages a rapid-rise which can then collapse before you bake it. Use a large spatula to mix the dough. Add most of the water, stir well and add more as needed. It will be fairly wet - a little stiffer than hot porridge. This is important because the corn-meal and bran will absorb quite a bit of the water during the long, first rise. This whole-grain recipe uses a full 1/4 cup more water than the recipe using all 'white' flour.

Keep scraping any dry flour off the sides and bottom of the bowl and, using the flat side of the spatula, press down and lengthen the gluten strands that are already forming within the dough. Don't chop the dough at any stage of mixing as this breaks up the gluten-strands. Just keep folding and spreading the dough till all ingredients are thoroughly mixed and the dough has a spongy, springy feeling.

Cover bowl with plastic-wrap or a towel, and allow to rise in a mildly warm place without drafts. Ideal temperature for rising the dough is about 70 F (21 C). In the summer (when temps are naturally warm enough) and winter (when your house is heated) you won't need to add any heat but in autumn and winter, when night time temps might be too cool, put a few inches of warm water in a pan, put your bowl with rising dough in it and wrap the pan and bowl in a towel to keep heat in.

First rise: 12 to 15 hours - I usually start my bread at around 6:00 in the evening. It's usually ready for its 2nd rise about 9:00 the next morning.

Heavily dust a pan or tray with flour. Sprinkle flour around edges of dough so that as you use the spatula to scoop out the dough that it doesn't stick to sides of bowl (see picture below). The original recipe suggests you let the dough 'rest' for 10-15 min before working it but I haven't noticed much difference in results if I leave this step out. If I have the time, I do it. Also, if the air-temp is cool when I do this stage, sometimes I warm the pan/tray by running warm water on it (and then thoroughly drying before I pour out the dough). I think of the dough as a living entity (or community of entities - after all the yeast is alive!) and try to bring a sense of nurturing and caring for this community to bring about best results.

If you've made bread before, you might be used to a fairly vigorous process of kneading the dough for best results. This recipe requires a very light touch. As I read different bread-books I learned that you want to stretch the gluten strands but be careful not to tear them. Begin by sprinkling more flour on your lump of dough and pressing the dough out flat and long, gently pulling it longer. Fold the ends into the middle; press;, stretch. Fold sides into middle; press, stretch. Press out air-bubbles as you go or you could end up with a loaf that has air-pockets just under the crust (doesn't cut as easily...). Whenever it gets sticky, sprinkle a bit more flour. Gradually, in a few minutes, you'll have a piece of dough that is smooth and not sticky to touch.

Floured pan on left, to pour dough into. Note flour around edges of dough in bowl; this makes dough slide out of the bowl without sticking.
Grease a standard-sized bread pan and place dough in it. Allow it to rise in a warm, draft-free place for 2-4 more hours. When dough reaches the top of the pan, or crowns a little above it, it has risen enough.

Bake in 375 degree pre-heated oven for 35-37 min.

Allow to cool on a rack for at least 20-min. before eating (I know, it's so hard to resist cutting it open right away! But it will continue to bake slightly as it cools and it will be far easier to cut if you wait a bit!).

Here I am with a recent loaf. Whole grain breads don't typically rise as high as all-white loaves but, if you follow the recipe you'll be happy with how spongy and chewy your results will be!
If I'm making two loaves I mix two sets of ingredients in two separate bowls but you could experiment with doing the mixing, and first rising in one bowl. It would probably work fine.

Variations: Add dried fruit/raisins and/or seeds/nuts. If you add these heavier ingredients, add a tiny bit more yeast (1/8 teaspoon) and be sure they're distributed evenly in the dry-mix before adding water.

* - Look for flour with the highest protein-content possible; this will produce a higher gluten content and more stretchiness and 'rise' to your bread. All-purpose flour will work but you may not have as good of a result.
** - Fine-ground cornmeal: If you buy it and it's too course, use an electric coffee-grinder to further grind it. We have a coffee-grinder that we devote exclusively to grains, seeds and nuts so no strong flavors are mixed in. 
*** - Yeast: Add slightly more if you add dry fruit or nuts - but don't be tempted to go overboard. If you add too much yeast, your dough will rise too fast and then collapse before you bake it.

Everybody loves bread!

Tuesday, October 3, 2017

Still Going Strong!


A great year for blackberries! Yumm!
I'm writing on a beautiful, crisp autumn day. Gentle  rains began to fall last week breaking the long stretch of hot, dry weather. Lush summer greens are shifting into muted browns, golds and russet-colors signaling the end of another fertile garden season.

Despite the devastating setback of herbicide contamination to our potting soil mix (LINK and LINK), the gardens rebounded amazingly. Harvests have been averaging over 400 pounds/week since early August and, with the majority of our winter-squash still to go, and quite a few tomatoes still ripening, this average should extend through much of October.
Tomatoes thriving after initial set-back. A new variety: Amish Rose. Thanks to Steve Rose for his tomato-plant donations.
Cabbage was not affected by the herbicide and we grew a record amount! Chris, "going up for a shot!".
Our relationships with people and agencies continue to grow throughout our small town of Monroe (population 680). The main recipient of the garden's surplus produce (after feeding the coordinators, volunteers and other local donors) continues to be the South Benton Food Pantry (LINK). We are so grateful for our growing partnership with SBFP -- they have given us three, $500 grants and covered the cost of a supplemental refrigerator to handle the overflow of summer harvests. The director, Janeece Cook has also been refreshingly open to suggestions of increasing the number of whole, unprocessed foods offered by the Pantry.

Llyn with part of a week's harvest delivered to S. Benton Food Pantry.
We have also shared weekly harvests with students in a class offered by our local, award-winning Health Clinic (LINK) who are pioneering a "Food as Medicine" program promoting a Plant-Based diet to address the epidemics of diabetes, hypertension and obesity that effect both rural and urban communities alike.
Garlic- food as "medicine!
Adri-11 months - 2012.
Other occasional recipients of our produce have been Junction City's Local Aid, the Monroe Gleaners, the Senior Lunch Program of Monroe and Muddy Creek charter school where one of our younger garden members, Adri, - just started kindergarten (she's been coming to the gardens since she was first born!).
Adri and Bella - best garden buddies - 2017.

Bella and Adri digging up potatoes. When kids help grow and harvest their own food, they're more likely to eat it!
Our relationship with Oregon State University continues to thrive and deepen. On average we're bringing two groups of six-students each to the gardens for four-hours per term of "service-learning" (volunteer-work in the community). These visits  are a highlight of each season as it is refreshing to see the students' slow turning towards greater ecological consciousness coupled with a willingness to put these ideals into action. The students also get a huge amount of work done!

Christy and Chelsea - planting garlic - Sept. 2017.
Visiting OSU class on Sustainability - the "V" sign means: "Live long and volunteer often!" This class actually brought posters they'd made, mapping out our valley's local food-system.
Lucas and Savannah - OSU giving final presentation about the Ecological sustainability of our local food system. Other groups explored the Economic, and Social aspects of Sustainability
OSU students spreading wheat-straw as mulch.
Llyn and Haley sifting compost. Scarlet runner bean blossoms in foreground.

Shawn (r) was a service-learning student in 2016 and returned this summer (with sister Sheila) to continue to learn about gardening. He is always a big help - great thoroughness and attention to detail!
We're excited about a new relationship forming with the Monroe Grade School (kindergarten through 8th grade) that shares our back-fence property line. We've been approached by a 7th grade teacher who is teaching a unit on Sustainability. Students choose from a menu of actions  that help them live more Earth-friendly lives and will also join the Gardens in a morning of "service-learning"--spreading out through the town with rakes and recycled leaf-bags to collect as many leaves as they can to fill our compost bins and help cover our garden-beds for the winter.

Organic gardening requires A LOT of organic material for soil-fertility. Here, OSU students "turn" a compost pile composed of leaves, grass-clippings and garden "waste" (weeds and plants pulled up after harvest).
One, giant  'volunteer' squash plant grew out of our composted manure pile and produced all the squash pictured above! An inedible 'ghost pumpkin'  -- we'll be offering these squash to MGS students as a thank-you for raking leaves.
This year we have had a much smaller core-group of volunteers. This was a conscious decision on our part as we noticed in previous years that by having a weekly group of 4-6 "share-givers" that a) Chris and I often held off on doing certain projects so there'd be enough for them to do; b) 'staging' the projects and keeping everyone engaged on volunteer days was sometimes more tiring than actually doing the projects ourselves and c) with that many people coming at once, we rarely had time to visit with everyone and enjoy the social time that the gardens were meant to provide. We are grateful to everyone who has come volunteer this year but a special thank-you goes out to Jim and Cindy Kitchen - participants since 2010, who have come almost weekly this summer and continue to find ways of showing their support through little treats they squirrel away in our pantry; clothes, tools and housewares they offer to us to use or pass along and a general feeling of including us as members of their extended "family".
"Husky" Grandpa Jim - husking blue corn to be dried and ground. We're finally growing enough corn (and beans)  to share with our volunteers this year (and enough for Chris and I to eat year-round).
Adri and Grandma Cindy in the bean patch.
And finally a hearty welcome to our newest garden-member: Caleb Deweber, born late December 2016, he's finally accompanying his mom, Sabine who is in her third year of helping in the gardens. Welcome Caleb! (Thanks also to Sabine and her family for all the "goodies" they've been stocking up our pantry with - yumm!)
Caleb, already a big fan of tomatoes! "If it doesn't get all over the place, it doesn't belong in your face!"
Gratitude to other volunteers who have helped throughout this season: Eva, Rook, Christina, Shawn, Sheila, Judy-Mom, Uncle Craig, Manfred, Yvonne, Wanda, Becky - we appreciate you!

Sabine's parents - Manfred and Yvonne visited from Germany this year. We look forward to seeing you again next summer!


Christina and Rook weeding the beet-patch. We sure had some interesting discussions, didn't we?

Jim and Llyn - autumn tasks in the greenhouse. Llyn is setting out sunflower heads to dry for winter bird-seed.
A great year for artichokes - here is an artichoke left to go to seed. "...mmm, so fragrant! The bees love 'em!"