|
| Red Iceberg Lettuce - a summer rose! |
Here in the Pacific NW, we start our lettuce seed in a greenhouse in
late February and then transplant the starts out in April or May when
conditions allow. We're vegetarians and end up with
a lot of
those white, plastic, square tofu containers. We've found they make
great tubs to start small seedlings. We drill holes in the bottom for
drainage, fill with a good potting mix (using the
bottom of another tofu tub to pack the soil firmly and make a flat surface for the seeds).
After misting the soil so it is good and damp, we sprinkle the lettuce
seeds with our finger-tips trying to have a 100 or so seeds per tofu
tub. Lastly we gently sprinkle a thin lay of cover soil over the seeds
and lightly mist to settle the seeds. They must be kept moist but not
overly wet or the seeds and starts may rot. Lettuce seed germinates best
in a cool soil so don't put it on a heat mat or under a lamp to get it
to germinate.
 |
| Lettuce seedlings in a tofu container. Using a pen to make holes for transplants. |
When the seedlings are about 1/2" - 1" (2 cm) high, they are ready for
transplanting. We put ours in regular or "jumbo" six-packs. We use a
basic, organic potting soil and add our own fertilizer. To each
wheelbarrow of soil we add about two cups of all-purpose organic
fertilizer and about a half-gallon of sifted rabbit manure . When
germinating tiny seeds (such as lettuce), we sift the soil before adding
amendments so the seedlings don't have to push past un-composted bits
of bark or wood-chips in the soil. For transplanting, we don't bother to
sift the soil.
 |
| Transplanting seedlings |
For the Sharing Gardens, where we might grow 1,000 or more lettuce
plants per season, transplanting is done in large batches. Being
systematic in the nursery will save you time and materials and you will
have much better results. Have labels ready so you keep track of the
varieties you are transplanting. Fill a flat of six-packs and mist it
with water and soak the seedlings too. Wet soil is less shocking to
transplanted roots than dry. Cupping your hand over the whole tofu-tub
of seedlings, flip it over and tap the bottom, catching the whole clump
of soil and seedlings in your hand. Gently flip it back over and place
it on a tray to catch the loose soil as it drops off.
 |
| Seedlings "hardening-off". |
Using your finger. a stick or some other object, make a generous hole in
each of the cells of the six-packs. Pull off a clump of seedlings and,
holding them by their leaves, tease apart a single plant with its roots.
On a cool, overcast day you can lay a large number of the seedlings
alongside their holes before dropping them in and squeezing the soil
around them. If the day is hot or the sun is strong, work in smaller
batches so the seedlings don't get shocked. It is very important that
all the roots go
down
into the soil and are covered. If they stick out from the surface, this
is called 'J-rooting' and will often kill the plants as they dry out
too easily. This is why you want to dig a generously-sized hole so the
rootlets don't catch on the sides as you lower them in. after pressing
the soil in around each seedling, water them in gently to settle the
soil. Label the tray and move onto the next.
 |
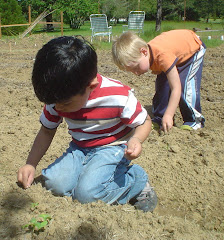
| Transplanting peas and lettuce |
Depending on warmth and sunlight, and the size of the six-packs you use,
your lettuce will be ready to plant in the soil in six to ten weeks. If
you stagger your plantings it will mean your lettuce doesn't all come
ripe at once. Ideally you wait until the root ball has filled the
six-pack cell enough to hold the soil as you pop it out, without being
totally root-bound
(roots coming through the bottom of the six-pack). A week or two before
you transplant into your garden, bring the starts outside and begin
"hardening them off". Put them where they will get plenty of sun but not
too much wind. They will withstand a light frost but if it is going to
get
very cold, or doesn't warm up in the day, bring them back
into the greenhouse till conditions improve. During this hardening-off
period, prepare garden beds so they are ready to receive transplants. In
our "deep-mulch/minimal till" gardens, we pull a row of mulch over to
the adjacent path (with a pitchfork) and, with a trowel dig a small hole
just the size of the lettuce's root-ball. This leaves worm holes intact
and lettuce seems to thrive without any roto-tilling needed.
 |
| Several weeks after transplanting. Picking individual lettuce leaves for salad. |
Here in our area, slugs can be a real problem in the spring. Follow this
link for ideas on how to re-use milk cartons or soy-milk containers to
thwart off their feasting.
Re-Purposing Things
We don't find that additional fertilizing is necessary for lettuce
plants. They receive enough nutrients from the soil. We hold off on
mulching them because we want the sun to warm up and dry out the soil
and mulch provides habitat for the slugs. Sometimes, after the lettuce
is well established and the soil is warmed up, we mulch with a few
inches of grass clippings around our plants. Let the clippings dry out
for a few days on a tarp or in a bin. Fresh clippings, if piled thickly,
can heat up considerably and burn your plants.
 |
| Chris Burns with beautiful lettuce harvest! 2011 |
We plant our lettuce spaced about 6" - 8" (12 - 15 cm) apart. We harvest
them intermittently giving the remaining lettuce room to grow. In the
early stages, before the heads are fully formed, we harvest one to three
leaves off each plant, rather than clipping whole heads. As the heads
become full size we harvest by cutting them off at the root with a
paring knife, leaving the roots in the ground to feed the worms.
Fall Crops: Give yourself 45 - 60 days (before hard freezing) to
grow your fall crops of lettuce. You can assist your lettuce in
germinating if you begin the process in a shaded area so the soil isn't
too warm. Once seedlings come up, they will need sunlight to grow but do
this outside of the greenhouse so they don't get too hot. Heat triggers
the plants to "bolt" (go to seed) even when the plants are very young.
Favorite varieties: Everyone who eats out of our gardens seems to prefer green lettuce to red, or at least to have
some
green to mix in with the red. (This even includes the bugs who seem to
devour the green lettuce much more voraciously!) Our recipients also
seem to prefer head lettuce to the "leaf" lettuce. We don't know why
this is (maybe just habit...) but we take this into consideration when
we plant out our gardens. There are hundreds of varieties of lettuce to
choose from. The most popular ones we grew this year were:
Buttercrunch
Chartwell's Romaine
Green
and Red Iceberg (home-grown Iceberg lettuce is
much more nutritious than store-bought).
Four Seasons (a red Romaine-type lettuce)
Next installment: How to Save Lettuce Seed