Our new and improved site

(with the same content as this one, AND MORE!) is

www.The SharingGardens.blogspot.com/

Showing posts with label compost. Show all posts

Monday, January 9, 2017

Winter at the Sharing Gardens

Our newest greenhouse - the Sunship - Sept. 2016
Greetings everyone! Here we are heading into our ninth year with the Sharing Gardens, Can you believe it? From our humble beginnings at Alpine Park, with an 80'x80' garden-plot, an 8'x8' greenhouse, a handful of tools and willing spirits we've grown to the thriving, expanded project we are today.

In the beginning, we didn't even have pictures to use on our website so borrowed photos Chris had taken in previous gardens. LINK to first Post - A Seed is Planted Our readership has steadily grown over the years and is currently experiencing a surge in readership that peaked with over 17,000 site-visits in December 2016 alone! It has tapered off slightly since this peak but we are still averaging 300 visits per day. These visits come from all over the planet both for practical gardening knowledge and for inspiration about the power and joys of generosity.

Home-grown dinner!
This post features info about what happens at the Sharing Gardens during the winter months. Enjoy! From December through about mid-February, activity in the gardens is minimal. Here in the Willamette Valley of Oregon, our winters are typically cold and rainy (with occasional snow and freezing temperatures) and the shorter day-lengths mean that any plants that are still growing in our greenhouses (kale, fava-beans) just maintain their current size, without adding any growth until days get longer.

So, just what DO we do to prepare for the coming Spring?

Because we practice a style of gardening that requires deep mulch, even in our greenhouses, the winter is time for preparing beds. Preparing Garden Beds - One Low-Tech Way-LINK
 
Our largest greenhouse with tomato plants on left, peppers and fig-trees on right. October 2016.
As the season comes to a close, and the last of the summer crops have been harvested, we rake away the left-over straw from the paths of the greenhouses. We remove cages from the tomato and pepper plants, cut them off at ground level and cut them stems up in 6" - 8" pieces and put these pieces in the paths underfoot. The stems are too course to decompose by planting time which is why we don't cut them in the garden beds. Cutting them speeds up decomposition and, by the time plant-roots are reaching out under the greenhouse paths, the stems will be almost entirely broken-down.

The next step is to cover the paths with the straw raked off prior to cutting up the plants. Clear any remaining straw, or plant matter off the greenhouse beds. The garden-beds - where we'll be planting in the spring - are generously sprinkled with coffee-grounds, and a dusting of wood-ashes.

Greenhouse beds covered in 1/2' coffee-grounds and a light dusting of wood-ashes.
We have been experimenting with creating greater soil-fertility using coffee grounds and wood-ashes. Coffee grounds are available for free from most coffee-shops; they're grateful to have someone come pick them up! And though they're not sustainable, they are a free resource at this time. For some reason, red-wiggler worms (also called manure worms) just love coffee! If you spread it liberally on your soil, they will migrate to find it. Their worm poo (castings) provides many nutrients that plants love and the tunnels they make help aerate the soil. Wood ashes should be used sparingly; they are very potent but provide a bounty of minerals to the soil.

Worms love coffee grounds!
Coffee grounds provide generous amounts of phosphorus, potassium, magnesium, and copper. They also release nitrogen into the soil as they degrade. When we have it, we spread it about 1/2" thick. We also layer it into our compost piles. Coffee grounds - Will They perk Up Plants - LINK

Wood Ashes provide all necessary nutrients except nitrogen and sulfur.  We use ashes from our wood-stove (that heats our house). We use only newspaper to start the fires and burn pure wood. We don't burn anything with paint; no ply-wood or other man-made products so the chemicals in them don't get into our food-chain. We sift the ashes to remove any big chunks, nails or screws. Be very careful not to use too much! We put just the lightest dusting in our beds. Do not use wood-ash to make a potting soil. It is caustic to worms and will alkalize your soil so use only a little and wait before planting seeds or seedlings. Do not use around acid-loving plants (like blueberries, or in potato-beds). Article from our local University Extension Service: Wood Ashes Can Benefit Lawn and Garden

Chris adds leaves to the greenhouse-beds - about 6" is ideal.
Next we add a thick layer of leaves, a layer of straw and, if we have it, green-grass clippings and more coffee grounds. Ideally we cover each garden bed with a layer of carpet, or cardboard - to keep in moisture and hasten decomposition, but sometimes we just leave the rows open to the air. All this organic matter is slowly eaten from below by worms and fungi and bacteria. In the spring, these beds will be ready to plant our new crops.

December 2016. Note trellises for winter-peas, a re-purposing project from an old chicken-coop (from left, to center). Light-green carpet covers row in lower-right corner.
Winter is also a time for pruning our fruit trees and blackberry bushes. Pruning helps fruit trees stay healthy and productive. Almost all our fruit trees were mangled by deer in their first year and a half so we still haven't had much fruit from them yet. Most of them have lots of fruit-spurs this winter so we're hoping that 2017 brings more fruit. In a few years' time, our 3-dozen apples, pears and plums should yield enough surplus that we can share the bounty with local food-charities.

 August 2016. Here is our first harvest from an Asian pear we planted in 2014. Not much, but they sure were delicious!
We've been enjoying herbal tea made from rosehips and fennel-seeds we grew and dried. Here are rosehips from rosa rugosa a hedge-rose that grows well in our climate that we started from seed three years ago.
October 2016. In mid-Autumn, we mulched most of our outdoor garden-beds with leaves and straw so they will be ready for planting in the spring. Chris looked under this straw just last week and found many worms! Even though the ground is saturated from winter-rains, the worms thrive at the surface where the straw meets the ground.
January/February is the time to plant biennial, root-crops for seed.
Carrots, beets and onions all produce seed in their second year so you must save them in your refrigerator or a root cellar and re-plant them to grow-out for seed. We plant them in gallon pots in January or February and than transplant them into the ground later in the spring. Seed-harvest occurs through much of the summer-months.

Tomatoes, peppers and squash make a bright compost pile!
We continue to build our compost piles. We don't have as much material to add to them at this time of year as the garden-debris has mostly been collected. The bins we are filling now won't be ready to use in the gardens till summer-time but you can never have too much!

We continue to process food for long-term storage. Llyn likes to make pumpkin-pie filling for freezing. In early January she noticed some of our Provence squash was showing signs of rotting so she had a marathon session and froze ingredients to make 22 pies. Yum! Making Pumpkin Pie from Scratch - Recipe - LINK

Baking Provence squash, a favorite for pie! Yes, it really is that orange, and so sweet!
Winter is also time for indoor-construction projects. Below, is a wood stove that Chris made from a kit that comes with legs, a collar and door for the stove. Holes must be cut out of the barrel using a metal-cutting saw. We purchased a used barrel from a food warehouse and Chris discovered that the barrel we bought for $4 had almost a gallon of honey still in the bottom which he drained and we enjoy on our toast!

 Here's a wood stove that Chris made from a kit.
Cleaning and lubricating hose-fittings, valves and timers so they'll be ready to use in the spring.
Each summer we dedicate a sizable amount of garden space to crops that store well: winter squash, potatoes, beets, carrots and storage onions to name a few. We want to be able to augment the Food Pantry's fresh produce offerings for as long as possible when their donations from other local sources begin to diminish. To be honest though, by the time all our share-givers receive their share of winter crops, the only thing we really have surplus for the Food Pantry is winter squash. Perhaps in future years we'll be able to increase our output, or other local gardens will join us in the project and dedicate a row of their space to storage crops to share.

Last week we delivered the last of our winter-squash and hot-peppers that we had saved to share with the Food Pantry. Because we plant our peppers and tomatoes in greenhouses, we can harvest them after everything outside is drooping and dying from heavy Autumn rains. We do have to harvest them before the first hard-freeze or they'll rot on the plant, even in the greenhouses. Our last harvest this year was December 6th!

The last of summer-harvest! Dec. 2016.
We are so grateful that the winter solstice has passed and that days are getting longer! In another six weeks (mid-February) it will be time to start seeds again for cool-weather crops (onions, cabbage, broccoli, lettuce, to name a few). Still plenty of time to finish our pruning, paint some more signs, clean and organize our garden-sheds and workshop and perform other maintenance tasks.

August 2016. Can't wait for next year's tomatoes!
The Sharing Gardens project is a unique model of community garden that is 100% non-commercial, uses local materials for soil-fertility, provides thousands of pounds of free produce to local food-charities and encourages gardening as a way to increase wildlife habitat. 

Tuesday, August 24, 2010

The benefits of deep mulching

Deep mulching produces a bounteous harvest!
Here in the Sharing Gardens we practice a style of gardening known as "deep mulching". Just as it is rare to find bare soil in nature, in our gardens you won't find much exposed soil either. We use the materials that are easily available in our area (grass clippings, leaves and spoiled hay) and let nature do the work of increasing the garden's fertility. People who raise livestock such as cows, goats, chickens and rabbits know how important it is to give appropriate food, water and shelter to keep their animals healthy. In turn, these animals produce by-products that are beneficial to the people who care for them, not the least of which are the nutrient-rich manures used as the basis for many commercial fertilizers. In the Sharing Gardens, we tend to "livestock" on a slightly smaller scale. Worms, fungi, beneficial insects and bacteria are the micro-livestock we care for with our heavy mulching. They, in turn, provide a natural balancing of the soil along with castings and other "waste products" that feed the plants' rootlets right where they need it most.

Mulching feeds your "micro-livestock"

In these first years of establishing new garden sites in Alpine and Monroe, we also use a high-quality organic fertilizer, our own worm-castings compost, and rabbit and llama-doo applied judiciously to the plants that need a boost. But we don't apply any single concentrates of nutrients such as lime or gypsum as we have found through years of gardening experience that a garden's soil can get seriously out of balance through the application of these concentrates.

What materials make good mulch?  It is best to choose materials that are readily available in your local area. Urban gardeners may find that leaves and grass clippings are easiest to come by. Many cities will actually dump a load of leaves for personal use if you have an adequate drop-site. Do be aware that you can't be 100% sure of the kind of leaves you're getting. There is also likely to be some residue from oil and other materials from motorized vehicles (though probably not enough to be very concerned about). You'll need to be sure and use good gloves in distributing city-leaf piles as its possible that broken bottles or other sharp trash could be mixed in. Hand-raking leaves is our favorite method for gathering this valuable resource. Leaf-raking gives you a great work-out without being too strenuous (we call it "rakey" therapy -ha.) You can use tarps to haul the leaves to your garden, or bag them in leaf-bags. Sometimes we have stored leaves in rings we crafted from fencing, or just made a deep pile and tarped it for the winter. This latter option produced very rich, yummy, decomposed leaf compost by the following spring. The thinner the leaf, the easier it breaks down. Maple is our favorite. Oak takes a long time to break down and we wouldn't recommend using it unless you mix it with other types of leaves. Fruit-tree leaves are also great. Don't ever use walnut leaves as they have natural substances in them that are poisonous to plants and will destroy your garden's fertility.
Maple leaves make excellent mulch

If you live in, or near the country, spoiled hay makes a great mulch. Many farmers have hay from previous seasons that has become wet or moldy or otherwise unsuitable to feed to their livestock They will usually be glad to have you haul it away for free, or very little per bale. If you don't have a trailer, you might be able to arrange for the farmer to bring it to you if you give him something for his gas and time.

Another rural source for excellent mulch is to clean out the stalls of goats, sheep, cows or horses. It's ideal if their bedding material is straw. If wood chips or saw dust is their bedding, you'll only want to use it if its been composting for a year or more. The heavy balance of carbon in the wood-products can actually leech nitrogen from your soil..

A delivery of spoiled hay

When to mulch? In the cycle of a year's gardening, there are two main times for a mulch "push". At the end of harvest, when you're putting your garden to bed, if you have a large enough quantity of grass clippings, raked leaves or animal bedding from cows, goats, sheep or horses that has manure mixed in, you can apply this liberally and roto-till it into the ground. This gives you the whole winter for the micro-livestock to digest it in time for spring planting. It is not a good idea to till your mulch into the ground in the spring time because the "browns", the more woody/cellulose aspects of the mulch that are high in carbon will bind with the nitrogen in your soil and effectively rob it from your spring seedlings if tilled in too close to their planting.

The second cycle of mulching begins in the spring and continues throughout the summer as you plant your garden rows. In our gardens, we have used a roto-tiller to loosen the beds and then mounded them into raised beds by hand or with a tractor. In future years, as the soil improves through the addition of organic matter (hay, leaves etc), and the worm colonies have become well established, we may be able to maintain these beds just using a broadfork (a human-powered tilling tool that is less disturbing to the soil).

Why mound the soil? We take the time each year, to mound the soil into raised beds for several reasons. As you can see from the photo, in the wetness of the Pacific NW spring, it keeps the roots from drowning by raising them above the water table. Also, if your rows run east to west, the whole south side of them faces the sun which can significantly warm the soil temps; another great advantage to most seedlings' early growth. The mounded soil doesn't ever get walked on so, over several years, if you maintain your rows in the same spaces, this soil becomes very light and fluffy, with good "tilth".
Advantages of raised beds...
If you're using all that hay and grass clippings, what about weeds? This is a question we get asked a lot. Bringing a whole bunch of hay into your garden may not seem like a good idea as you also bring a bunch of weed seeds that can then germinate in your garden soil. They key is in applying enough mulch, soon enough. In our Alpine plot (80' x 100'), in the first year, our friend was able to till the ground a good 8" deep thus killing all the grasses/weeds already growing at the site. We mulched heavy and early and, in the whole season we probably weeded about a five-gallon bucket's worth of weeds out of the whole garden. No kidding. For contrast, in the Monroe site, because of a very wet, cold spring and the urgency of moving ahead and simply getting some things planted before the soil had had time to drain sufficiently for deep tilling, the ground was only tilled about 4" deep. Many of the weeds and grasses were only "scalped" and came back strong in the garden beds, so we have pulled many wheelbarrows full of weeds out of that garden. But the weeds are only coming up in the garden beds themselves. In the pathways that are heavily mulched, the weeds exhaust themselves before they can grow up to the light. As they die, they become mulch too and their rootlets provide yummy snacks for the worms to follow along as they work the soil.

How much is enough? You want to put enough of the material to keep in the moisture and block the sun from reaching any weeds growing in the paths. Hay bales often naturally break into "flakes". Just lay these in your paths, end to end, without fluffing them (which can scatter seed into your beds) and make it easier for weeds to grow through (5" to 8" is ideal). If you're using dried leaves, they too should be about 6" thick. Grass clippings work best if you put them locally around the base of plants (leave about a 2" gap around the  stem of the plant). When applied liberally in the paths they can form a gooey surface that can be quite slick and dangerous to walk on. They also become "felted" or matted down making it harder for water to seep through to the plant's roots. You'll be amazed to see, over the course of a year, that the 8" of mulch you applied in May, June or July, will be almost totally digested (from below) by the following March/April when you begin the spring plantings. Worms travel up to the surface of the soil at night and feed on the mulch, carrying it back down into the soil in their gullets and distributing it as castings throughout your garden.

Alpine Garden - 10 weeks after breaking ground 2009

 A summary of the benefits:
  • Keeps moisture in (less watering). Though when you water, you must water long and deep to be sure the water penetrates down through the mulch and into the soil. In our Monroe garden, we have gone over two weeks without watering in the heat of August but we watered each section of the garden for over two hours at the beginning of those two weeks. When you're first planting a bed - with seeds or transplants, you need to water more often till the plants are established. To check if you need to water, lift mulch in the paths and check for moisture level in the soil. You can often see red worms and tiny rootlets extending from the plants growing in the beds.
  • Keeps weeds down.
  • Balances your soil-nutrients (your "micro-livestock" keep things balanced without you having to figure it all out.)
  • Moderates day/night temperature fluctuations in the soil.
  • Adds organic matter to keep soil from becoming too sandy or clay-bound.
  • It's very comfortable to sit or kneel on as you cultivate and harvest your plants. (We had a photographer come to our gardens once and said it was "the most comfortable" garden she'd ever been in!)
 Sources for mulch:
  • Municipal leaf-gathering
  • Raking your own (offer to rake your neighbors' in exchange for keeping the leaves.)
  • Farmer's moldy or spoiled hay
  • Set up your own collection site: Rural transfer stations appreciate any solution that keeps material out of the landfill. Below is a picture of a collection site Chris established near his farm in northern California. 
A gathering site for mulch donations at the local, rural transfer station.
Here are some other pictures of our gardens showing the deep mulch technique:

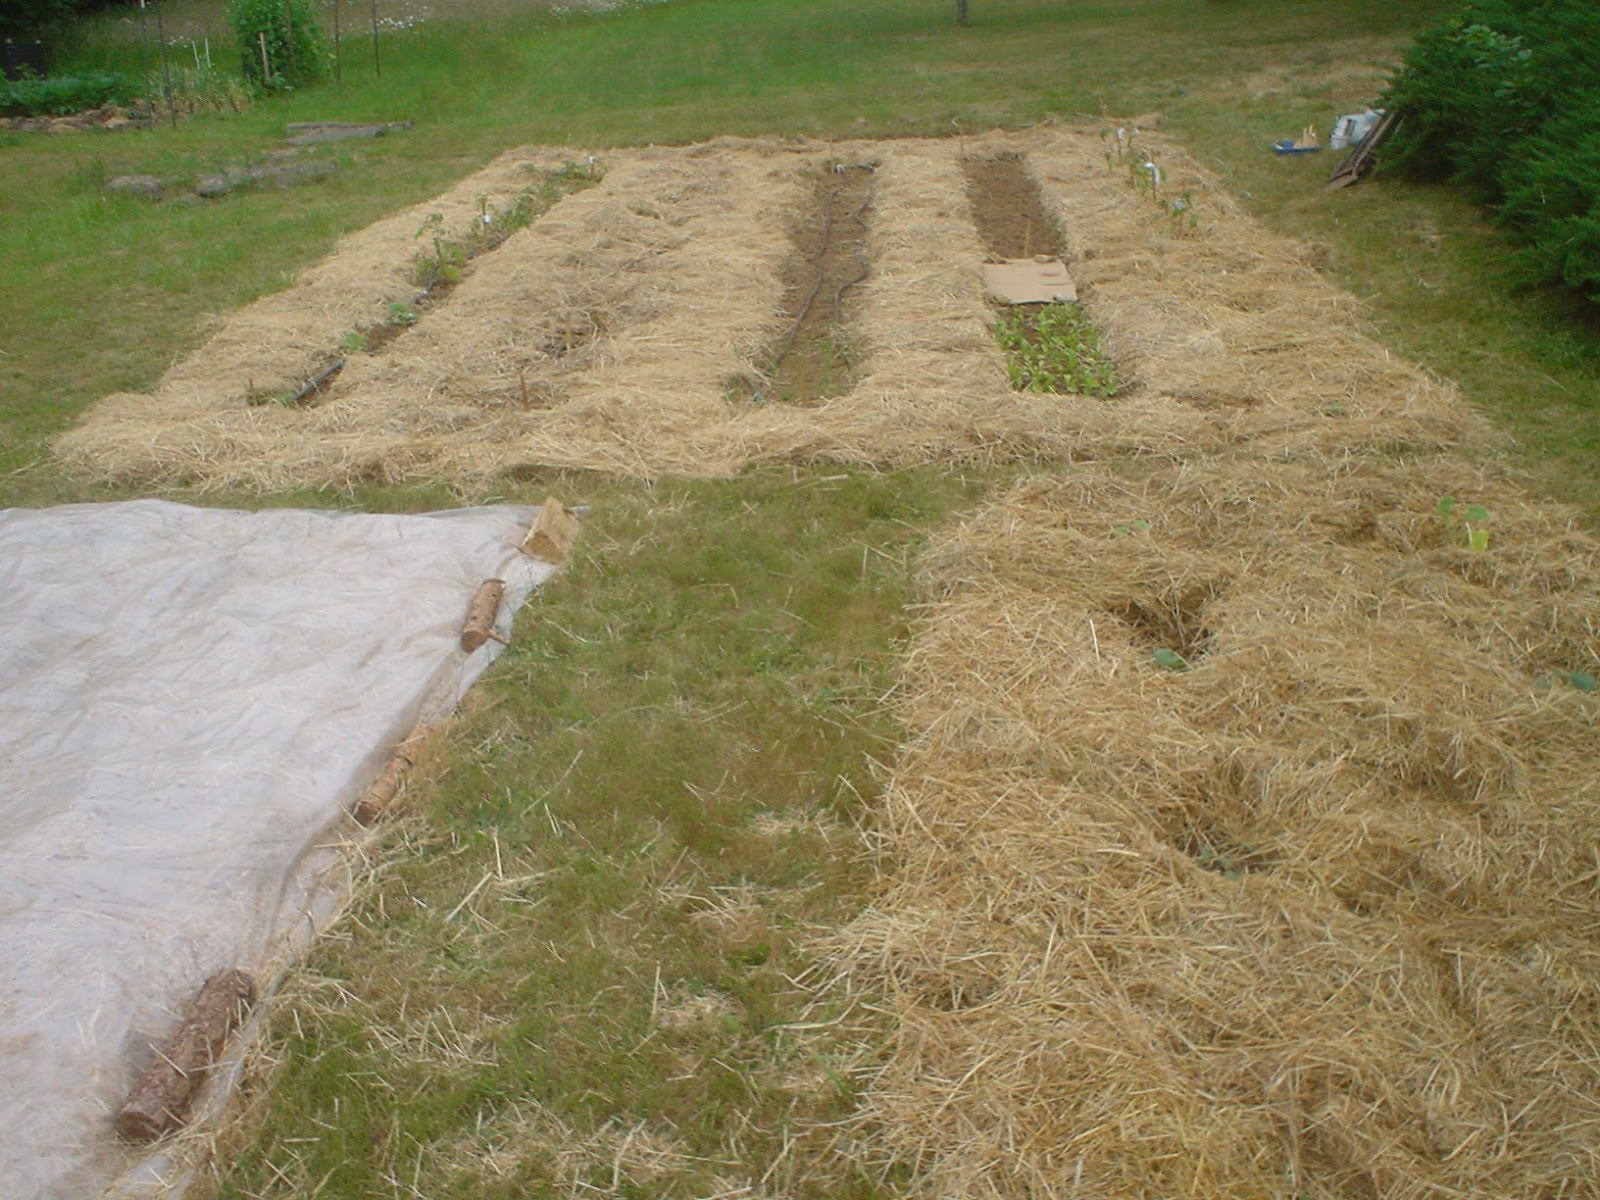
Another example of how the garden looks--fully mulched--with hay.
Tilling in leaves in the fall - so they have time to decompose by spring.
The potatoes were mulched first with leaves and we're adding oat-straw in the picture.
This was a "lawns-to-gardens" project where we simply scalped the grass from the beds and mulched the lawn path-ways. The plastic on left was placed to "solarize" the grass (kill it in preparation for fall-crop planting).
Here Chris is using lettuce that has "bolted" (gone to seed) as mulch in the potato patch. Oat straw was then placed over it.
Fun in a leaf ring! (Robin, Chris' son in a "nest" of leaves1996)
Please read our post about Herbicide Contamination of Compost, Manure and Mulch

Wednesday, June 16, 2010

Hay-bale compost, Wish-List and Gratitudes

Hay-bale, slow-cook compost pile
One of our readers noticed this picture on our website of a hay-bale compost bin and was curious about making one. This kind of compost pile is ideal for the following conditions:
  • You have plenty of room (depending on size of hay bales, its "footprint" can be as big as 5' x 8').
  • You have enough time to leave it alone for several months while it slowly decomposes.
 If your situation meets these criteria, here's how to make one: 

 Make a box of hay-bales.

Important: Before you make a hay-bale compost bin, please read our post about Herbicide Contamination of Compost, Manure and Mulch

You can start this hay-bale compost any time of year but its ideal if you make it in the fall as you're putting your garden to sleep for the winter and will have large quantities of plant-matter. Lay your hay-bales in a rectangle, one layer high. As you pull up your squash, corn, tomatoes etc toss them in the pile. If you're putting in "woody" material or thick stalks (corn, sunflower etc) they will break down faster if you cut them into smaller pieces with a machete or pruners. Mix in some rotting apples or kitchen scraps (vegetable matter only please) to attract red wriggler composting worms. Since the pile will shrink by at least half over the winter, pile it high, stomping it down as you go. Put a tarp over the pile once the winter rains start and by spring you'll have a beautiful pile of organic matter to nourish the new plants you're transplanting into the garden.

Sifted compost to nourish transplants - put a big handful in as you plant them.

Do not put in grasses from your garden that can grow from bits of their roots. For example: Bermuda grass or Quack grass etc. This is a slow-cook pile and its not hot enough to kill these weeds. If you put them in the compost you will then spread them all through your garden when you "harvest" the compost!

Sifter with hinged legs. It can be moved to sift different piles of material in your garden.

One last step... In order to separate out the composted goodies from the materials that didn't break down over the winter, you'll need to make a sifter. Chris built the one above from lumber scraps we had leftover from other projects and some half-inch "hardware cloth" (wire mesh). The legs are attached with hinges so it can be folded up to move and also set at different angles. A simpler sifter can be made to fit over your wheelbarrow or garden cart - half-inch holes are ideal. Using our sifter, we place a tarp below it. You'll find it will work best if you use a spade-fork to break the compost pile into smaller clumps before tossing them onto the sifter.


The hay bales rot and decompose throughout the whole winter and make incredible sheet-mulch to put around your transplants in the spring. You'll notice as you peel off the 2-3 inch "flakes" (they're pretty gooey by spring-time!) that they are full of red worms, their eggs and castings. Your spring garden now will be infused with a new, healthy population of these mini-livestock. 

You will likely have many "volunteers" from the seeds of the plants you threw into your compost pile in the fall. Don't worry!You can easily weed them out if they come up in your garden beds.


Unsung heroes!

Important: Before you make a hay-bale compost bin, please read our post about Herbicide Contamination of Compost, Manure and Mulch

And now for local news:

Our current wish list: Our biggest need now is for a large quantity of spoiled hay and/or grass clippings (for mulch). Ideally we'd appreciate it if you can deliver them to the Monroe site but if you have materials and no transportation, perhaps we can gather a crew to come pick up your donation.  Give us a call if you can help us. Chris and Llyn - (541) 847-8797


Extra plants to give away: There are some tomato starts, SMR 58 Pickling Cukes, two Red Kuri squash (a winter/storage variety) and a few pots of chives that need homes. Look on the picnic table behind the picnic pavilion at Alpine. Please don't take plants off any other tables or out of the garden as these may be donations to the garden we haven't seen yet. We had over 250 onion sets that were left on a different picnic table...if you took them by mistake and haven't planted them in your garden yet, please bring them back or share the harvest with your friends and neighbors (smile).

 Gary Watts mowing Alpine Chapel Park

We have much to be thankful for this month, in spite of spells of rainy weather, volunteers Rann and Doreen have showed up weekly to help us with making tomato cages, transplanting and mulching the gardens. Gary Weems has continued to assist with the construction of the garden shed in Alpine. With just a bit of trim-work and painting, it's done. We've already begun filling it with tools and garden supplies. Steve Rose, Larry Hammon and Greg and Marilyn Palmer have donated a variety of tomato plants to the gardens. We've planted as much as we have room for (close to 200 plants!) and there are still some left over. Jan Fanger donated some interesting blue and red sprouting potatoes which we'll be planting down in Monroe. We've got a whole neighborhood effort bringing us grass clippings in Alpine: Thanks to: Curtis, Aubrey, Phil and his partner Jorie for helping us keep Alpine mulched. Bud Hardin has come on board with a generous $200 donation, fencing material we're using for tomato cages and a huge load of pots and flats for the greenhouse. Gary and Dorothy - of Alpine Pump spent a good portion of their day mowing the Alpine Park with a mower loaned to us from Diamond Woods Golf Course-great job you guys!  Jack Jones showed up that same day and tinkered on our donated lawn-mower to help us get it running better

 Dorothy Brinckerhoff mowing the center-lawn at Alpine's garden
Evelyn Lee donated us a string-trimmer she no longer needed and we've got that running now. Renee Duncan answered the call for a person to oversee the perennial beds in Alpine. We'll be using the volunteers' back-power to help her keep the flowering shrubs and flowers beds looking nice but its great to have someone oversee things. Renee also contributed some squash and pumpkin plants. Chester Crowson had a new pump installed at the Monroe site. We'll have 10-15 gallons a minute down there which will be great once summer finally gets here! Last but not least, Eva Fife has found a Philomath connection for some horse poop which she loaded and delivered to the Monroe site. The squash plants thank you, Eva! As you can see, the gardens are truly becoming a community effort. We do our best to acknowledge everyone personally for their contributions. If we have overlooked you, please send us an email so we can include you in the next post. Every bit helps!

Jack Jones tinkering with mower donated by Ray Kreth and Mylrea Estell