Our new and improved site

(with the same content as this one, AND MORE!) is

www.The SharingGardens.blogspot.com/

Friday, February 4, 2022

Valentines Day - Time for Pea Planting!

Healthy pea seedlings.
Garden tips for Peas: In our region (Zone 8a - USDA Hardiness Map), its ideal to plant peas around Valentine's Day. This gives them the best head start for blooming in time for the longest possible harvest season. The problem is that, here in Alpine/Monroe, Oregon, the soil is often very wet and cold this time of year and, even if you get a good start sowing seeds directly in the soil, the March and April rains can significantly retard their growth, the seedlings can rot off at soil-level, or slugs can decimate your starts.

If you have raised beds, direct sowing shouldn't be an issue but if, like us, you don't have that luxury, here's a method we've used successfully for several years  to deal with these challenges:

You'll need:
  • Seeds (link to article on saving your own pea-seeds)
  • Soil
  • 4" pots (6" deep) - the deeper pots give more time before plants become root-bound.
Fill pots to within a half-inch of the top. Gently tamp down soil so it doesn't settle too far when you water it.

Poke two seeds, in opposite corners, about the depth of one knuckle (3/4" or so). That's two seeds per pot. This gives each plant enough soil to germinate and grow to several inches in height before you transplant. Cover the seeds with soil so they're not exposed to sun. Water them gently. Do not over-water. Seedlings can rot if soil is too damp.
Note: Since having written this article, we have now shifted to planting two seeds per pot but do not have photos to reflect this.
If you're planting earlier than mid-February, you'll need a greenhouse to protect them and keep soil in pots warm enough for germination. If you wait until mid-February, pots can often be outside in a sunny place, protected from north winds.

When they are at least 6", and no longer than 12", you can put them in your garden, or greenhouse beds. Best to wait until their root-systems are quite dense in the pots -- almost "root-bound". They will be easier to transplant without damaging the plants. On the other-hand, if you wait until the stems are too long, you risk breaking stems during transplanting so it's a matter of finding the right balance.

Pea-seedlings in pots.
Transplanting: Plant each 4" pot (with its two seedlings) about 8"- 10" apart with bamboo stakes or other climbing trellis in between each clump of starts. Pea-plants are not typically transplanted but sowed directly in place. They are very susceptible to shock so be gentle with the roots and stems. Best to have your trellis in place before you transplant so you don't injure roots driving in the stakes. If slugs, bunnies or birds are a big issue in your area (they all love to nibble pea-seedlings!), planting them in the milk-carton collars can make a big difference (Link to post on Re-Purposing Things - including milk-cartons as collars). We also typically sprinkle about a teaspoon of iron-phosphate ("Sluggo") around each bunch of plants. This is an organically-approved way of dealing with slug/snail infestations in your garden. (LINK to article about iron phosphate).

Good idea to have trellis in place before you transplant peas (so you're less likely to damage roots).
The plants will go through a little stress from transplanting but once they acclimatize to their new environment they'll be well along the way to yielding a bounteous and long-term harvest!

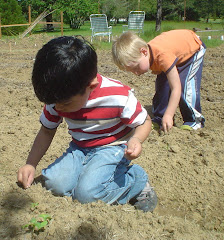
Chris and Jesse transplanting in the Alpine Garden - 2010.
Pea-vines headed for the compost pile. Peas, being legumes are able to add nitrogen to your soil through a symbiotic relationship with organisms that grow on their roots. This will help improve your soil, particularly if you leave the roots in the ground when you cut down the "greens" to add to your compost pile.

Other relevant posts for early-spring gardening:


Sprouting potatoes? What to do.

Onions - Growing From Seed


Wednesday, November 13, 2019

Lettuce: From Seed to Feed - Part 2: Saving Seed

By Llyn Peabody 

If you grow your own lettuce, as the weather warms, it's not uncommon to have some of it "bolt" (try to go to seed). Saving lettuce seed is fairly easy and a good entry-point for those new to the process. Here is a re-publishing of a post we wrote back in 2011 but the information is just as relevant today. Happy seed-saving :-).

Saving your own seed is an important aspect of developing local food self-reliance. Relying on commercial seed farmers may become increasingly unreliable as climate change disrupts weather patterns and seed crops falter. Growing your own seed slowly modifies your plants to be uniquely suited to your micro-climate and growing conditions. Networking with other seed-savers in your area builds a sense of community. LINK: Locally Sustainable Gardening in the Face of Supply-Chain Shortages
 
Lettuce flowers - close-up.

Seed-saving can seem intimidating at first. I know I felt that way. Many vegetables will cross with their neighbors yielding inconsistent results. There are many questions that must be answered before moving forward. For this reason I definitely recommend Suzanne Ashworth's "Seed to Seed". It is a comprehensive manual that covers all aspects of seed-saving. I am also grateful to my husband, Chris, for all he has taught me from his 40+ years of gardening. He's helped me translate the book knowledge into experiential learning. Saving seed appeals to the outlaw in me, I guess. Like treating illness with herbs I grew myself, there is something empowering about developing skills usually left to "the experts". As it turns out, it's not really that difficult at all.

"Red Sails" lettuce - blooming.

Saving Lettuce Seed: Like most things in gardening, a bit of forethought goes a long way. Ashworth recommends 12' - 25' separation between types of lettuce to prevent cross-pollination (the farther the better). Plan your plantings (and harvesting) to leave sufficient distance between the flowering plants. Though you may have enough time to bring a Fall crop of lettuce to seed, we usually do our seed-saving with the lettuce we plant in the Spring.
 
Note: Be sure there is no wild lettuce that is forming seed near the varieties of domesticated lettuce you are saving seed from as it can cross. The plants that grow from these crossed seeds tend to be more bitter and course. There are several varieties of wild lettuce; this one is named Lactuca Serriola LINK.

Lettuce bolting - Black-Seeded Simpson

 Lettuce is an "annual" crop. This means that the plants will produce seed in one season (without over-wintering). As the weather gets hotter and drier you will notice on romaine or "leaf" lettuce a definite lengthening of the plant. ("Leaf" types form a loose rosette of leaves but not a tight "head). When it lengthens, it is starting to "bolt". Lettuce that is bolting gets noticeably more bitter (probably nature's way of protecting the plant in this important phase of its reproduction). On "head" lettuce (such as Iceberg), Ashworth says it can be helpful to slit the head, forming a cross-cut with a sharp knife, making it easier for the flower-stalk to emerge. She says some gardeners strike the head of the lettuce with the palm of their hand thus breaking the leaves away from the stalk. Without some effort to free the flower-stalk, head-rot from heat and humidity may kill the plant before it can go to seed. So far we have saved seed mainly from "leaf" lettuce. This summer we will experiment with our red and green "head" lettuces to see what works best for us and report back.

Lettuce marked for seed with bamboo.

As we are gardening with a group of people, we have found it essential to clearly mark the plants that we are saving for seed, so they are not harvested by accident. We have made small tipi's with bamboo sticks, tied a red ribbon around the plant or put a small sign on a stake and driven it in nearby. Even a plant that is obviously past an edible stage for harvest is not safe as a well-meaning fellow-gardener may assume the responsible thing to do is weed out your seedy lettuce plant and toss it on the compost pile!

Staked lettuce - the flowers get heavy.

As the flower stalk grows it will produce a big head of flowers. You may need to tie it to a stake so it doesn't fall over. Seed production occurs 12 - 24 days after flowering. Ashworth says you can harvest seeds daily by shaking the stalk over a large paper sack. The ripe seeds will fall into the bag. The method we have used is to wait until the majority of seeds are ripe and to cut off the whole flower head and place that in a paper sack. Leave the sack open in a warm, dry place (like the top shelf your tool shed) until the flowers are thoroughly dry. Be sure to label the bag with the name of the lettuce variety. If mice are a problem and you have the space, try hanging the open bag from rafters.

To winnow the seeds, roll the flowers between your fingers and the palms of your hands to free them . Lettuce seed is challenging to separate because the seeds are not much heavier than the chaff. Patiently drop small amounts of the seed/chaff over a tray, from a height of a foot or two while blowing gently. The seed should drop and the fluff blow away. Some people run the seed through screens but we have not tried this method. Commercially available seed-sifting screens are another option. They have different sized holes.

Put ripened lettuce flowers into a paper bag to finish drying.

Lettuce seed will remain viable for 2-3 years if kept in a cool, dark place, in an air-tight container.


The Sharing Gardens is a non-profit and tax-exempt organization. We exist entirely through donations. If you have found benefit from our project or our site, please consider making a donation through PayPal. (Click button below.)

Saturday, October 26, 2019

Making Your Own "Veganic" Potting Soil in Your Greenhouse Paths - Using Worms

October 2019: Here is a timely re-post of an article we wrote earlier this year about harvesting worm-castings out of our greenhouse paths. We're proud to announce that for the 2019 season we didn't purchase any fertilizers and were able to grow close to 8,000 pounds of fruits and vegetables using locally available resources to feed our worms: leaves and grass clippings. We supplemented with wood-ash from heating our house, and coffee-grounds that volunteers bring us from coffee shops. We're almost done harvesting the worm-compost from our paths this year and it looks like we'll have almost double from last year's  harvest.  Enjoy!
Here is one of our greenhouses in mid-Spring. Note how the paths are filled deep with straw and other "organic-matter". As we water the plants and walk over the beds, we help the worms and micro-organisms turn this dead plant-material into nutrient-dense compost for next year's soil.
For those of us with greenhouses in which we plant directly in the ground (as opposed to using the GH to protect seedlings in pots, on tables) the necessary pathways between planting beds can seem like a lot of wasted space. Over the years, we've developed a method of composting right in the paths, creating habitat for worms and micro-organisms so that, over the course of the growing season we generate (and then harvest) large amounts of fine, high-quality worm-compost using locally available materials often considered "waste" products. We describe our methods below.

"Veganic" method for creating soil-fertility: Over the last few years we have become increasingly convinced that moving toward a veganic method of farming makes a whole lot of sense from several perspectives. Veganic agriculture is defined as:
...an approach to growing plant-foods that encompasses a respect for animals, the environment, and human health. Also known as "stockfree" "vegan organic" and "plant-based," this is a form of agriculture that goes further than organic standards, by eliminating the use of products that are derived from confined animals and by encouraging the presence of wild native animals on the farmland. (LINK: Intro to Veganics)
For many organic farmers\gardeners, if not most, fertilizing the soil means adding some type of manure and\or other animal-based products such as bone meal, fish meal, blood meal, feather meal, etc. Here at the Sharing Gardens, being vegetarians ourselves and wanting to grow food in a way that aligns with our values, we are interested in developing, and demonstrating ways of growing food that uses local materials, gathered in a sustainable way with a gentle impact on the environment.
"Veganic" agriculture: good for the Earth, good for our health.
Here is our current method of building our soil-fertility - right in the paths of our greenhouses!

Gathering Materials: Our method of gardening requires massive amounts of "organic matter" (leaves, straw, grass-clippings etc). In the many years since we started the Sharing Gardens (2009) we have developed relationships with the people in, and around our small town encouraging them to bring us these materials instead of burning them or sending them to the land-fill.
One of our neighbors brings us many trailers full of leaves each Fall. He used to burn them. Now he uses some to mulch his own garden-beds but still has plenty of surplus to share with us.
Our land is over three-acres. We have left much of it as grass so that we can harvest this valuable resource. (LINK-Grass Clippings and Leaves for Soil Fertility). When we have surplus from mulching our plants, we spread it in the greenhouse-paths to feed the worms and micro-organisms.
A System for Collection: For many years, the only people who brought us leaves and grass-clippings were those we had made a personal connection with. In 2017, a teacher from our town's Grade School approached us about doing a volunteer project with her students to help the Sharing Gardens. We spent a morning with the students and raked up over 35 big bags of leaves around town! (LINK: Yes, Money Really Does Grow On Trees!) In the Fall of 2018, our city-hall contacted us about inserting a notice in people's water-bills encouraging them to bring their leaves to our garden. We estimate this yielded another close to 50 bags of leaves. We imagine that in future years that number will grow as people hear about the program. LINK: Monroe Leaf Drive
Here's the sign we painted and set up along the road in front of our house for the 2018 leaf-drive.
As people donate their leaves, we hang the bags out to dry on a clothes-line in our greenhouse and roll them into bundles of 5-6. We feel strongly about minimizing the use of plastics so any time a bag can be re-used is a real bonus!
We set up this station in our front yard. The trash-can has bundles of leaf-bags for re-use.
In the flier that was mailed to our town, we included these important guidelines:
Please no animal waste, trash or sticks/branches, no holly or roses (too sharp), or black walnut leaves (they can kill plants - LINK). Just leaves and grass 😊.
The need for sides on your beds: With this method, it is important that your paths and beds be separated with sides so your soil doesn't mix with the materials in the paths.
Chris has made many of our greenhouse beds with recycled fence-boards held in place with stakes driven into the ground. We have used plywood ripped into four-inch strips too.
Spreading materials: Since our method of creating soil is cyclic, we could begin at any point in the process but if you are just getting started, the first step is to spread the materials. We begin this process at the end of Autumn as we are dismantling the tomato-cages, pulling up pepper-plants and weeding the beds in preparation for the following Spring.
Here is a greenhouse path that has been "harvested" of its worm-compost. It is ready for new materials to be added.
After cleaning all of last season's plant material out of the beds, cutting it into small pieces and laying it in the paths, we cover it with layers of leaves or straw, or whatever we have available.

One of our neighbors thatched his lawn and brought all that wonderful grass "hay" for us to use. Here is a college student/volunteer spreading it by the tub-full.
Llyn, spreading fresh grass-clippings on top of straw.


Creating worm-compost all season-long: From Spring through late Summer we continue to add organic-matter as it becomes available. By watering and walking on the paths we help the worms and other "micro-livestock" to break down the materials and turn them into soil.
This picture was taken in April. Note fresh grass-clippings in center and right pathways. Straw has yet to be covered with grass on left-pathway. Llyn is watering the bed of lettuce and waters the paths too, to help in the decomposition process.
During the growing season, the worms and micro-organisms are 'digesting' all this material from below. On tours of the greenhouses we often pull back the mulch to show people the thriving colonies of red-wiggler worms that live in our paths. Many times we can show them worm-eggs as well and little worm tunnels they have formed down into the rich, black compost.
Another benefit of this style of greenhouse gardening is that the mulched paths are so pleasant to kneel on. Also, many plant roots (figs pictured here) will reach their roots out into the paths and be fed by this 'living compost' through the growing season. (Pictured: Bella and Adri harvesting potatoes).
Harvesting worm-castings: We stop adding organic matter by late summer. This means there is less material to move out of the way when it's time to harvest our worm-compost. This 'undigested' material is temporarily gathered in tubs, or piles and then returned to the paths after the worm-compost has been gathered.
Here, Chris scoops up the compost with a flat, hand-trowel. We collected fourteen, five-gallon buckets from this one, forty-foot x two-foot path!
A flat shovel works well too.
Sifting and storing worm-compost:
This homemade sifter works well to remove large material and give the finished product a uniform texture. The screen is made with "hardware cloth", a wire-mesh with 1/2" holes.
After sifting, we often store the worm compost in re-purposed pellet-stove plastic bags. Storing them in this way preserves the material's moisture.
Mixing soil and starting seedlings: In the past we have been fortunate to have pre-used-soil donated from two-different nurseries at the end of their growing seasons. Though the nutrient-content of the soil was mostly depleted, the structure of the soil was still excellent as it was high in organic-matter, perlite and other substances to keep the soil light and fluffy. We are careful to only accept soil-donations from 'organic' growers (no herbicides/pesticides). Our mix-ratio was 'one-part' worm compost to 'two-parts' depleted soil.

If you don't have access to previously-used soil, there are many recipes on-line for making your own. Typically they include coconut coir (a more-renewable resource than peat-moss) and sand or perlite - so the soil drains well, and compost for fertility. Use the worm-compost outlined in this article in place of the regular compost.

Always mix soil thoroughly so the different materials are evenly mixed and do a few tests with fast-germinating seeds (like radishes) to make sure you have a good mixture.

Update October 2019: This year we have not had any used soil donated and our worm-compost harvest has greatly increased from last year so we will probably be starting our seedlings next Spring in pure worm-compost. Chris has done this before in previous nurseries, with great results. The only reason we didn't do it last year was that we had the pre-used soil donated and we didn't have as much worm-compost.

Pure worm-compost has great drainage due to all the organic-matter within. It's just that it contains more nutrients than young seedlings require so, if you have other material to mix it with, that doesn't cost you anything, it's a good idea to mix it and stretch it out.
Seedlings in our home-grown soil, Spring 2019.
Preparing beds: We also use the worm compost to fertilize our raised beds.
Chris spreading a layer of worm-compost in greenhouse beds. Note last year's tomatoes and other plant material in pathways (before we've added leaves on top). Excellent worm food!
Soil fertility is improved by adding wood-ash and coffee grounds: For some reason, worms love coffee grounds! By sprinkling grounds in your garden beds, you will attract worms to come into your soil. Coffee grounds also contain many nutrients on their own so, we also recommend adding them to your greenhouse paths and compost bins. They will attract worms and speed up the process of decomposition. (LINK: Coffee and Ashes for Fertility)
Spreading coffee-grounds: We have a friend who regularly stops by a local coffee shop and collects coffee grounds for us. Ideally, when we have enough, we sprinkle them about 1/4" deep over the beds. Note: Though coffee-grounds are neither a local or sustainable resource, currently the are free and by using them, we keep them out of the waste-stream.
Spreading wood-ashes: After coffee we add a very light sprinkling of wood-ashes (they are very concentrated and can 'burn' sensitive micro-organisms and the worms' skin and change soil pH). We only use ash collected from natural wood that has no paint or other chemical treatments. Since we heat our house exclusively with wood, this is another 'free' resource.
Through the early winter months, we hand-dig these amendments into the soil. This provides a pleasant activity during inclement weather...
...and a nice time for socializing.

In early Spring, once we begin mowing the grass again, it makes a nutrient-dense mulch directly on the beds. Worms love fresh grass-clippings and will migrate to beds where it has been added.
The cycle starts again - Spreading materials in paths: Once we have harvested the worm-compost, it's time to start the cycle all over again!
Tomato-plants systematically being cut-up into the paths. The fallen tomatoes and weeds in the bed to the left of Llyn will also be scooped out/dug up and put into the path to feed the worms.
Layer, after layer, we build up the organic-matter in the paths.
This includes straw (if we have it) and grass-clippings.
Planting in beds and continuing to add organic-matter to the paths:
The process is an endless cycle, creating soil-fertility from local and veganic materials.
Harvest!
This method of growing, yields nutrient-dense, delicious food!

Wednesday, October 23, 2019

Amazing Quince! Sugar-free Recipe

Hi folks - We've just made an amazing discovery. We love quince! When prepared as the recipe outlines below, quince tastes like a pear/lemon fruit with a hint of peach and rose-oil! Ambrosia!

This has been one of our most beautiful autumn seasons on memory! Pictured is the back of our 1875 Farmhouse, the yellow, shag-bark hickory tree (on the right) and a rainbow in-between.( October 2019 - 7:15 a.m.)
Every year, about this time, one of the Monroe "locals" drops off two or three HUGE boxes of quince at our local Food Pantry. The quince usually sit on the shelves, for a month or more, with a sign that says "Take as many as you as you can use," but very few people take any, including us. Eventually the Pantry folks get tired of looking at them and they end up in the Sharing Gardens compost pile.

Quince after harvest. Photo credit: LINK
We've been reluctant to try them because they're so darn hard to cut open which makes them seem like a real pain to prepare. Also, they are very tart when they're raw and every recipe we'd heard of called for lots of sugar. We're always trying to find ways to limit our sugar intake, not add to it! So, until we discovered the joys of quince, we just figured our compost piles were going to have a nice big influx of worm-food in a month or two.

That is, until I (Llyn) looked up their nutritional content and Chris and I were pretty impressed - particularly as a good source of zinc and copper. Minerals are often the most difficult nutrients to get enough of in our modern diets. Most farm soils are increasingly depleted and, unless you're getting your food from an organic farmer who replenishes those minerals in natural ways that the plants can absorb, (like wood ash - LINK) it may be difficult to get enough minerals from your diet without taking any vitamin supplements (which we don't). Quince are also low-calorie, high in anti-oxidants and great for digestion (their natural pectin is soothing to the gut!). Who knew? LINK

While I was browsing for more general info about the quince, I found a recipe that suggested boiling them for 8-10 min before baking them and then my cooking creativity kicked in and I came up with the recipe below. I've made it twice so I'm still fine-tuning it (so check back for updates!) But the best thing is, this recipe calls for no refined cane sugar (just maple-syrup, and not much of that) and is easy to prepare.

Pears (on left). Whole, boiled quince (in bowl). Quartered quince (below) - this picture was taken before I figured out how to cut fruit away from core (see below).
The Recipe:

4-6 medium-sized quince (about 5 cups)
4-5 medium yellow pears (about 3 cups) (or sweet apples)
1/3 cup maple syrup (about 1 TBSP maple syrup per cup of quince)
1 TBSP lemon juice (don't over-do the lemon, as quince is plenty tart already!)
1 tsp cinnamon

Choose uniformly yellow, fully ripe fruit without bruises or other damage. It helps if they are a uniform size (for boiling phase).

Bring a pan of water to boil - deep enough to mostly cover the quince.
Using your bare hands, run the quince under water and rub as much of the fuzz off as you can (don't worry if you miss some).

Place in boiling water for 8-10 minutes, depending on size. I think I over-did it the second time I made this. I was trying to soften the fruit all the way through but the core remained quite hard, even with longer boiling and the second time the outer fruit got rather mushy.

Lift the quince out of the boiling water and allow to cool.

Preheat oven to 375 degrees. Grease a baking dish with coconut oil or butter.
Combine ingredients for sauce in a measuring cup with a lip for pouring.

Once cool, using a cutting board, cut off any brown spots or other blemishes on the fruit.
Slice the remaining fruit away from the core in as big pieces as possible (see picture). Your knife won't want to go through the core at all. It's super-hard! Just keep shaving off pieces all the way around the core till you've gotten as much as is easy.

Cut fruit away from the hard core.
Cut the fruit into bite-sized pieces.
Wash and core the pears. Cut into bite-sized pieces.
Mix the fruit together by layering it into the baking pan.
Drizzle the sauce over top of the fruit. Gently stir the fruit and sauce together to spread sauce evenly.

Quince, pears and sauce - before baking.
Use a pan with a lid, or cover with aluminum-foil.
Bake for forty-minutes covered (or until juices are boiling).
Take out, gently fold the fruit and sauce together so the fruit at the top gets re-sauced.
Leave cover off and bake for 10 more minutes to lightly caramelize the top.

After baking. Yum!
We like ours chilled with a scoop of organic low-fat, plain yogurt and some organic, lightly sweetened shredded-wheat cereal crushed on top.
We'll keep experimenting...seems like raisins or date-pieces would be good raw or cooked in with the fruit. Also, some crushed walnuts or granola might be good too.

A Quince Essential Fruit - here's a fun post that gives more details about this unique fruit including growing tips.

Let us know of your discoveries/variations in the comments below.